Docker provides the ability to package and run an application in a loosely isolated environment called a container. Containers are lightweight and contain everything needed to run the application, so you do not need to rely on what is currently installed on the host. You can easily share containers while you work and be sure that everyone you share with gets the same container that works in the same way.
The most well-known use case for Docker is deploying production services, such as application services or databases, in enterprise servers or cloud instances. As containerizing production workloads become common, more software developers are using containers for scenarios beyond deployment, including continuous integration, test automation, and even full-featured software development environments, also known as, development containers. A development container defines an environment in which you develop your application before you are ready to deploy.
You might be wondering why you would even want to containerize your developing environment in the first place. Well, let me ask you some questions. Have you ever bought a new laptop or connected to a new remote server, and over time, you started to realize that your system is cluttered with projects, libraries, languages, configurations, tools, etc.? Wouldn’t it be nice to “restart” your software development environment to the same state as when you first acquired the system?
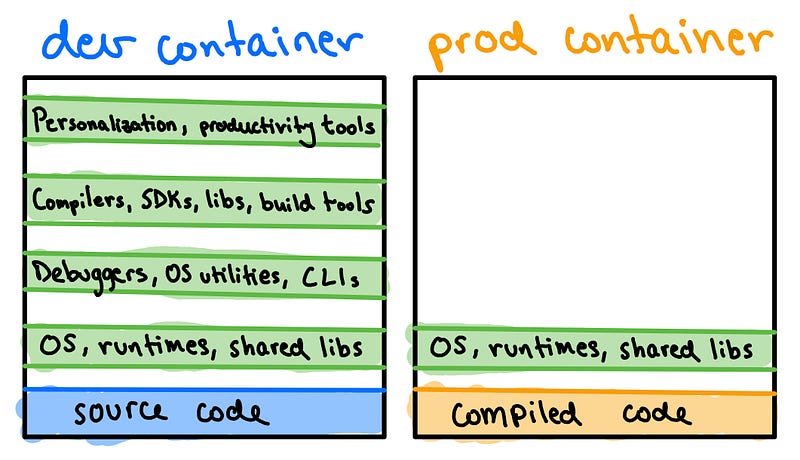
Development containers offer repeatable setup, and a consistent stateless development environment, leaving the underline host out of any project dependencies, specific language versions, etc. Furthermore, development containers allow users to use only the host machine for the computing resources it provides. Finally, since we are containerizing, we can replicate the same development environment across many different systems, assuming each has the docker engine installed, providing a consistent development environment. If this is something that sounds appealing to you, keep reading!
There are many tools and services that currently support using development containers. However, if you are familiar with containers, you may want to use a Dockerfile directly to customize your environment. Dockerfiles are a great way to extend images, add additional native OS packages, or make minor edits to the OS image. You can reuse any Dockerfile, but let’s walk through how to create one from scratch.
Firstly, you will need a parent image to build your base development image.
There are many good development images created by Microsoft available in
Docker Hub.
They are mainly intended to be used with
VS Code Remote — Containers
and GitHub Codespaces. I like to
have a general “sandbox” container because I intend to use it with multiple
projects or repositories. The large container image (mcr.microsoft.com/vscode/devcontainers/universal)
includes several runtime versions for popular languages like Python, Node,
PHP, Java, Go, C++, Ruby, and .NET Core/C#. It also includes a lot of popular
tools and package managers. If you like what you see but want to make a few
additions or changes, you can use a custom Dockerfile to extend it and
add whatever you need.
FROM mcr.microsoft.com/devcontainers/universal:latest

RUN apt-get install -y \
  neovim  \
  tmux

USER codespace
WORKDIR /home/codespace

COPY nvim .config/nvim
COPY .tmux.conf .tmux.conf
For instance, in the Dockerfile shown above, the parent image is extended by first installing neovim and tmux, which will help us with the development workflow. We also change the user to codespace and set the working directory to the user’s home directory. Finally, we copy over configuration files for each tool from the local machine.
Assuming you are in the same directory as the Dockerfile, you can build the docker development image by running the following command:
$ docker build -t devcontainer .
You can execute the following command to start a development container from the newly created image:
$ docker run --privileged -it devcontainer bash
The -it flag tells docker that it should open an interactive container
instance using bash as the Unix shell. We could have also mounted a volume,
using the -v flag, to persist data across different development containers.
Additionally, we could have also mapped a port using the -p flag in case we
are developing a web application. And as simple as that, you just created a
development container!
Note that we used the
--privilegedflag to start the docker container. Docker privileged mode grants a Docker container root capabilities to all devices on the host system. With the host’s kernel features and device access, you can run Docker inside Docker. This feature is very useful if we rely on docker itself as part of our development workflow.
If you want to learn more about development containers, I highly recommend checking out containers.dev. Additionally, if you want to check out how I use development containers, you can explore my dotfiles repository on GitHub!